
Build production MCP servers in TypeScript using @modelcontextprotocol/sdk with Zod-validated schemas. Choose stdio for local dev, Streamable HTTP for production. Avoid five critical failure modes that crash real deployments.
Build production MCP servers in TypeScript using the official SDK with Zod-validated schemas and three transport options. This MCP developer guide in TypeScript walks you from protocol fundamentals through transport selection, tool registration, and the five failure modes that break real deployments.
What Is the Model Context Protocol and Why Should You Care?
Quick answer: MCP is an open standard that lets AI models call your tools, read your data, and interact with external systems through a single, reusable interface, without writing a custom connector for every AI platform.
How do you give an AI model access to your database, your APIs, and your file system without writing a different connector for every tool? The Model Context Protocol (MCP) solves exactly this problem. The TypeScript SDK has crossed 13,000 GitHub stars (as of July 2026), making it one of the fastest-adopted AI developer tools released in recent years.
MCP is an open standard that provides a universal connector between AI applications and external systems. Think of MCP like a USB-C port for AI: just as USB-C provides a standardized way to connect your hardware without needing different cables for every device, MCP provides a standardized way for large language models to interact with external tools and data sources.
The protocol uses JSON-RPC 2.0 as its message format, which means every MCP server and MCP client communicates using structured JSON messages over a consistent transport layer. This makes MCP interoperable across programming languages, frameworks, and AI providers.
The Three Roles in Every MCP Connection
Every MCP session involves three distinct roles working together. Understanding these roles is the key to building your own MCP server.
-
Host: The AI application that initiates connections (Claude Desktop, ChatGPT, VS Code, Cursor). The host coordinates between the user, the AI model, and one or more MCP clients running inside it.
-
Client: A connector within the host application that maintains a single, stateful session with one MCP server. Each client handles tool discovery, capability negotiation, and message routing for its connected server.
-
Server: The service you build. An MCP server exposes tools, resources, and prompts to the connected client through a standardized interface. One server can serve multiple tools to a single client.
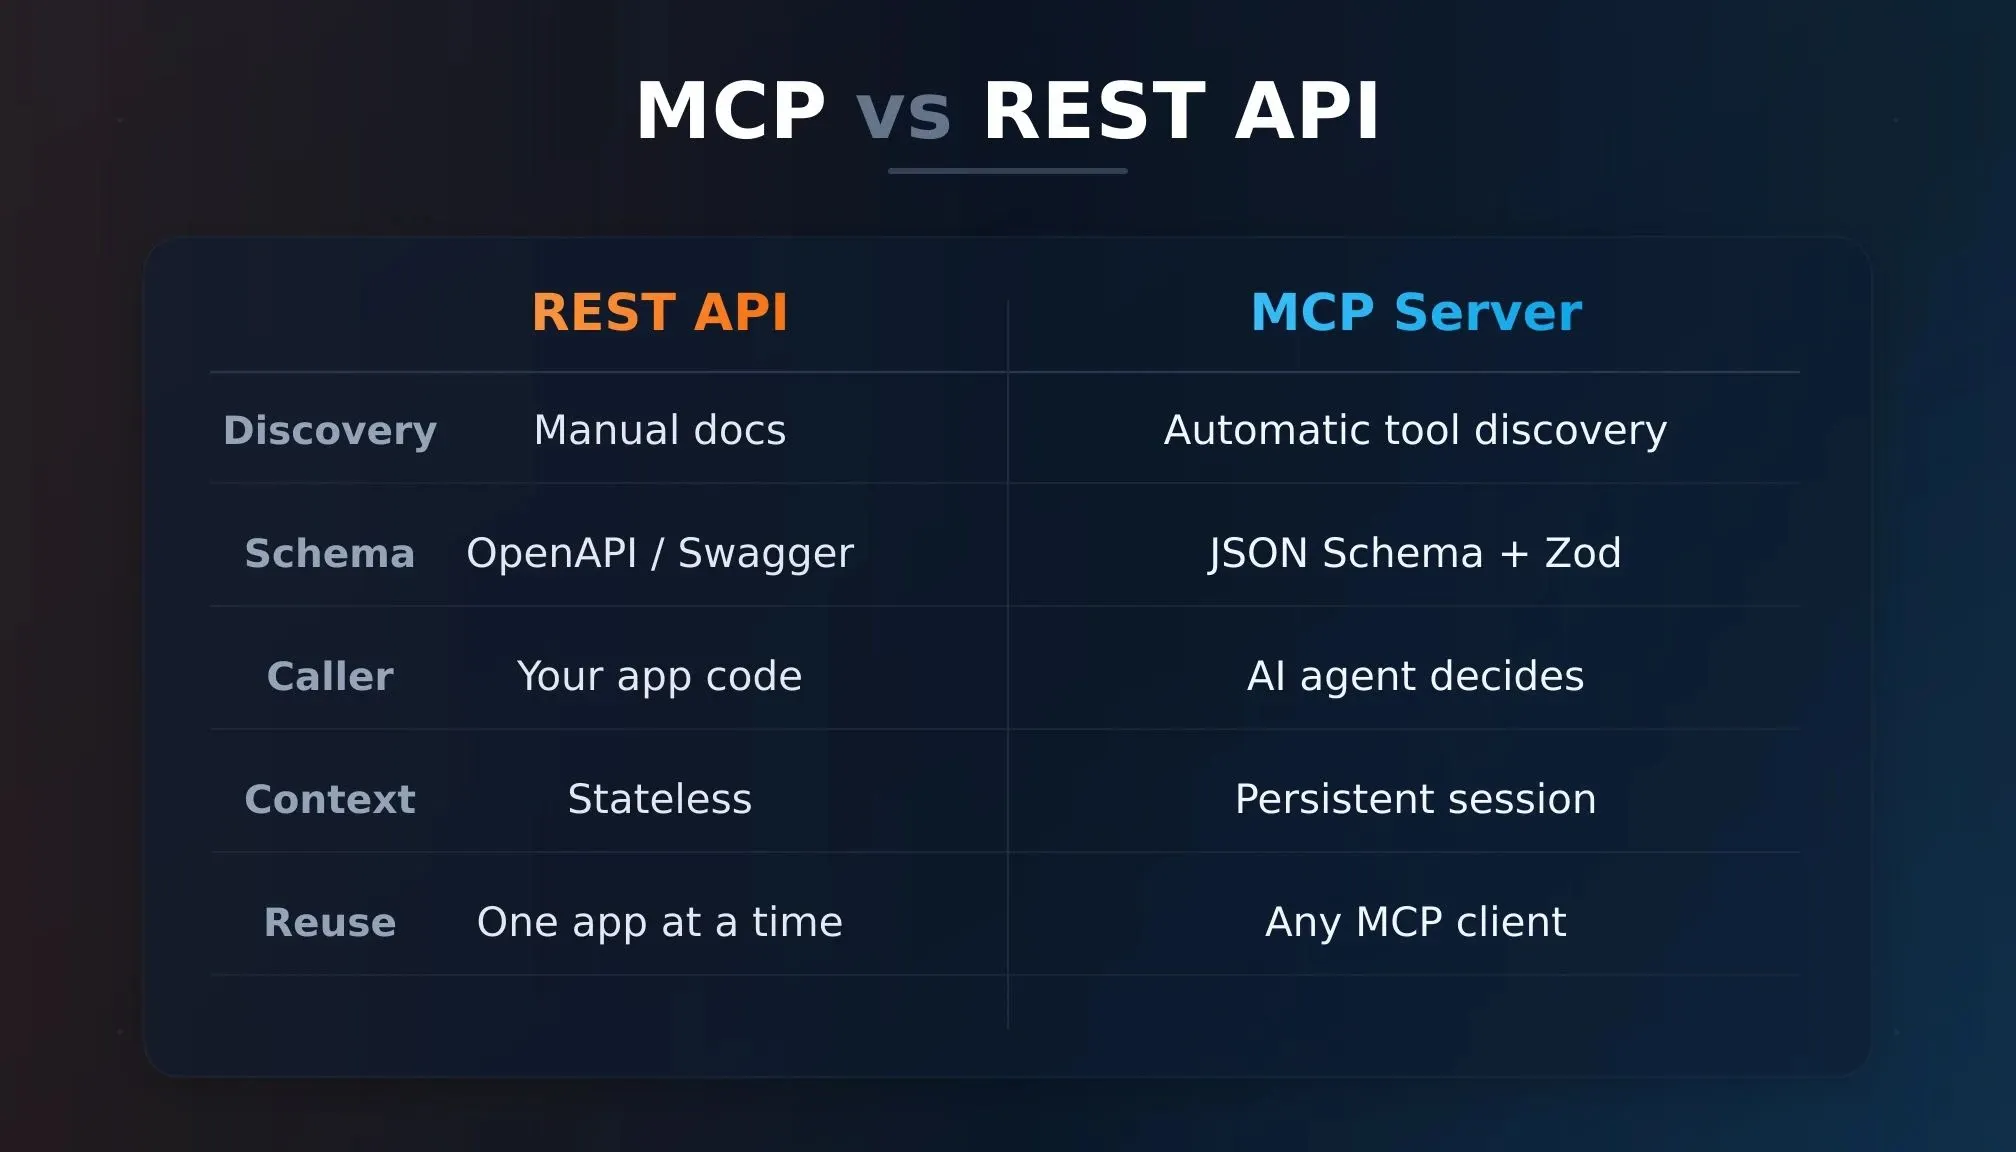
MCP vs REST API: five dimensions where the protocols differ fundamentally
| Feature | Traditional REST API | MCP Server |
|---|---|---|
| Discovery | Manual documentation | Automatic tool discovery |
| Schema | OpenAPI/Swagger | JSON Schema with Standard Schema support |
| Caller | Application code | AI agent decides when to call |
| Context | Stateless per request | Persistent session with shared context |
| Reusability | One app at a time | Any MCP client, any AI model |
The bigger picture here is reusability. Once you build an MCP server, any AI application with MCP support can connect to it. You write the server once, and Claude, ChatGPT, VS Code, and Cursor can all use it without changes.
MCP SDK Adoption at a Glance
The TypeScript SDK crossed 13,000 GitHub stars and 63,000 dependent projects as of July 2026, with the stable v1.30.0 release used across production MCP deployments worldwide.
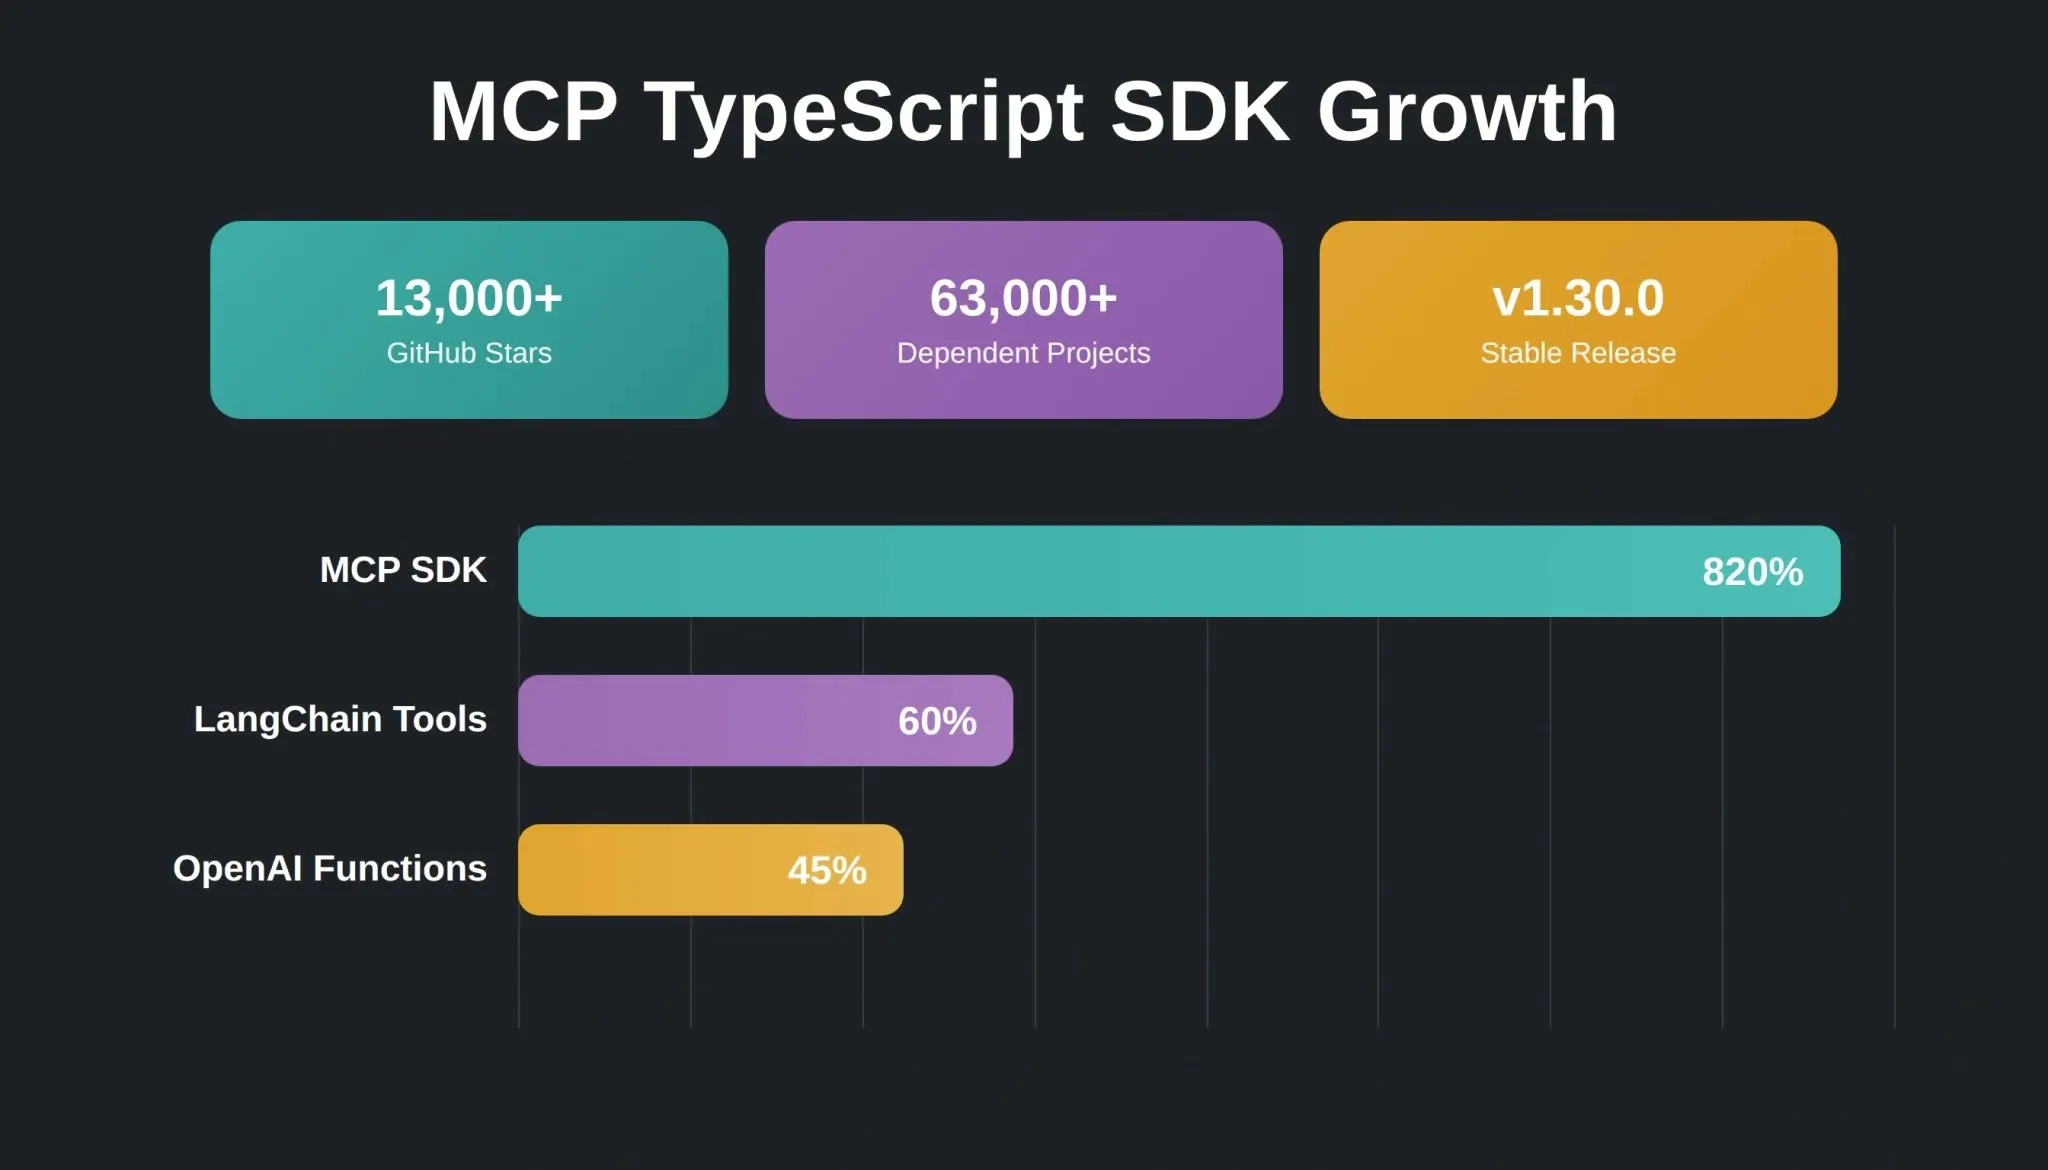
MCP TypeScript SDK adoption metrics as of July 2026
How Does the MCP Client-Server Handshake Actually Work?
Quick answer: Before any tool call, the client and server exchange an initialize/initialized pair to negotiate protocol version and capabilities, then the client calls tools/list to discover available tools.
Before any tool call happens, the MCP client and MCP server go through an initialization handshake. This process establishes what each side supports and sets the rules for their session.
-
Step 1: Client sends initialize with its protocol version and supported capabilities.
-
Step 2: Server replies with its own capabilities, available tools, resources, and prompts.
-
Step 3: Client sends initialized to confirm the session is active.
-
Step 4: Client calls tools/list to get the full tool catalog.
-
Step 5: Server returns tool names, descriptions, and input schemas.
-
Step 6: AI agent sends tools/call with tool name and arguments when needed.
This handshake is what separates MCP from a plain REST API. The server actively participates in a negotiation that lets the AI model understand what tools are available and how to call them correctly.
Which MCP Transport Type Should You Choose?
Quick answer: Use stdio for local development and desktop AI assistants. Use Streamable HTTP for production deployments, cloud hosting, and multi-client scenarios.
MCP servers communicate with clients over a transport layer, and choosing the right one depends on your deployment scenario. The TypeScript SDK abstracts the transport layer cleanly, so switching between them requires minimal code changes.
| Transport | Best For | Limitation |
|---|---|---|
| stdio | Local dev, IDE plugins, Claude Desktop | Single client per process |
| Streamable HTTP | Production, cloud, multi-tenant | Requires HTTP server setup |
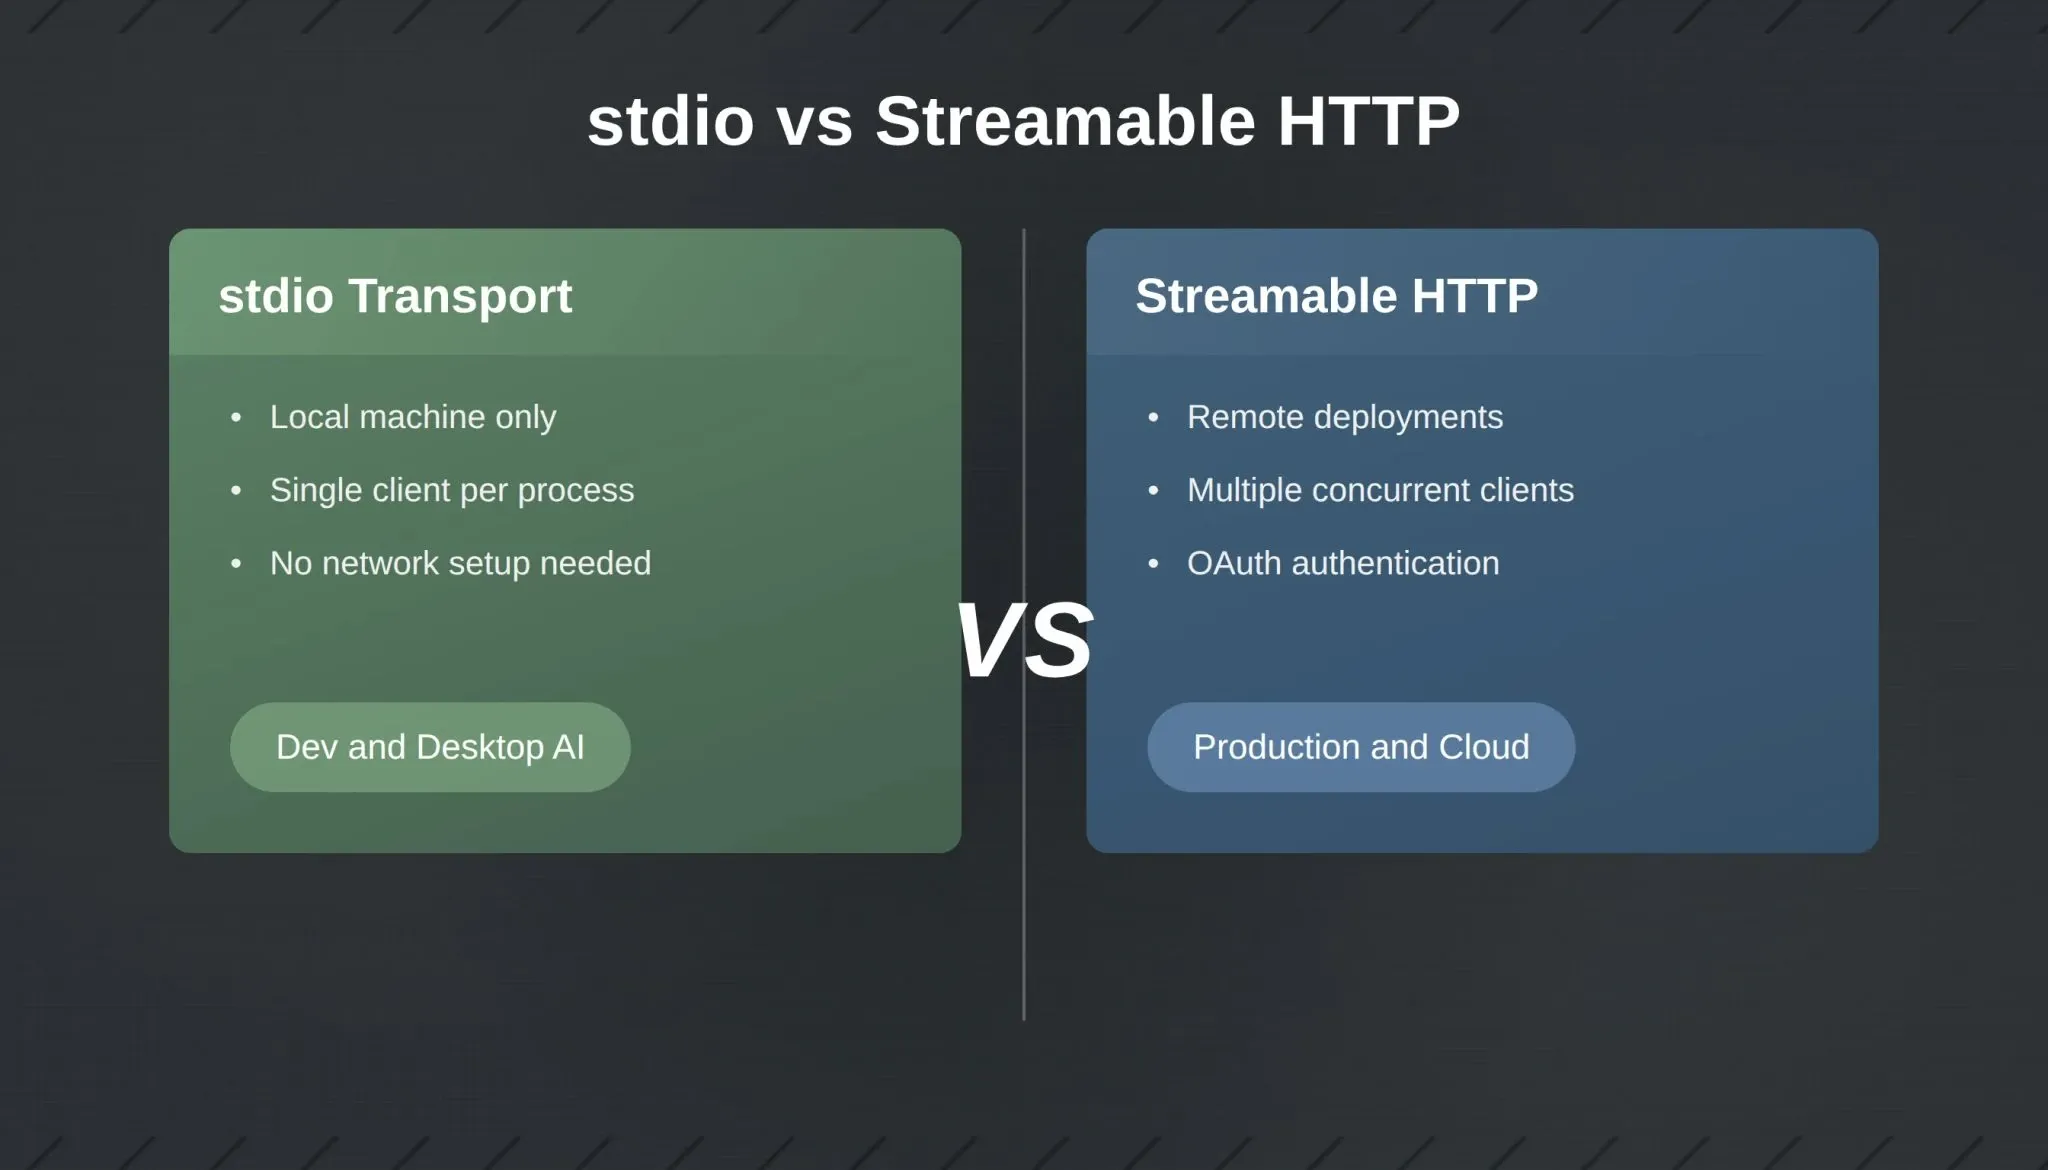
Choosing the right transport: stdio for local, Streamable HTTP for production
Stdio for Local Communication
The stdio transport uses standard input and standard output for local communication between processes on the same machine. This is the default choice for CLI tools, IDE plugins like VS Code, and local development setups where the MCP server runs as a subprocess.
How it works: The client launches the server process and communicates by writing JSON-RPC messages to stdin and reading responses from stdout. No network setup needed. Best for local development, desktop AI assistants like Claude Desktop, and scenarios where the server and client share the same computer.
1import { McpServer } from '@modelcontextprotocol/sdk/server/mcp.js';
2import { StdioServerTransport } from '@modelcontextprotocol/sdk/server/stdio.js';
3
4const server = new McpServer({
5 name: 'my-local-server',
6 version: '1.0.0'
7});
8
9async function main() {
10 const transport = new StdioServerTransport();
11 await server.connect(transport);
12 console.error('MCP server running on stdio');
13}
14
15main();
Streamable HTTP for Remote Servers
The Streamable HTTP transport sends JSON-RPC messages over HTTP POST requests, making it the right choice for remote server deployments, cloud-hosted MCP servers, and scenarios requiring multiple concurrent clients.
How it works: The client sends HTTP POST requests containing JSON-RPC messages to the server endpoint. The server can respond synchronously or stream results using Server-Sent Events. Best for production deployments, cloud-hosted servers, and multi-tenant scenarios. It supports multiple clients, authentication via OAuth, and works across network boundaries.
1import { McpServer } from '@modelcontextprotocol/sdk/server/mcp.js';
2import { StreamableHTTPServerTransport } from '@modelcontextprotocol/sdk/server/streamableHttp.js';
3import express from 'express';
4
5const app = express();
6app.use(express.json());
7
8const server = new McpServer({ name: 'my-remote-server', version: '1.0.0' });
9const transport = new StreamableHTTPServerTransport({ sessionIdGenerator: undefined });
10await server.connect(transport);
11
12app.post('/mcp', (req, res) => transport.handleRequest(req, res, req.body));
13app.get('/mcp', (req, res) => transport.handleRequest(req, res));
14app.delete('/mcp', (req, res) => transport.handleRequest(req, res));
15
16app.listen(3001, () => console.log('MCP server listening on port 3001'));
How Do You Build Your First MCP Server in TypeScript?
Quick answer: Install @modelcontextprotocol/sdk, create an McpServer instance, register tools with Zod input schemas, and connect to a transport. The full working example is below.
Prerequisites
Before starting, confirm you have:
-
Node.js 18+ (required for native fetch and ESM support)
-
TypeScript 5+ familiarity
-
Basic understanding of async/await and REST APIs
Project Setup and Dependencies
Start by creating a new project directory and installing the official TypeScript SDK. The stable v1 SDK is @modelcontextprotocol/sdk; this is the package used by 63,000+ dependent projects and all current production MCP servers.
1mkdir weather-mcp-server
2cd weather-mcp-server
3npm init -y
4npm install @modelcontextprotocol/sdk zod
5npm install -D typescript @types/node tsx
6npx tsc --init
SDK versions:* This guide targets the stable v1 SDK (@modelcontextprotocol/sdk). A v2 beta (@modelcontextprotocol/server) is in active development with API changes. If you are evaluating v2, check the beta changelog before copying these samples.*
Registering Tools with Zod Schemas
Each tool you register on your MCP server needs a name, description, input schema, and handler function. The AI model reads the description to decide when to invoke the tool, and the input schema defines what arguments the tool expects.
1import { McpServer } from '@modelcontextprotocol/sdk/server/mcp.js';
2import { StdioServerTransport } from '@modelcontextprotocol/sdk/server/stdio.js';
3import { z } from 'zod';
4
5const server = new McpServer({ name: 'weather-server', version: '1.0.0' });
6
7server.tool(
8 'get_weather',
9 'Get current weather for a city. Returns temperature, conditions, and humidity.',
10 {
11 city: z.string().describe('City name'),
12 country: z.string().optional().describe('ISO country code')
13 },
14 async ({ city, country }) => {
15 const location = country ? `${city},${country}` : city;
16 const res = await fetch(
17 `https://api.weather.example/current?q=${encodeURIComponent(location)}&key=${process.env.WEATHER_API_KEY}`
18 );
19 if (!res.ok) throw new Error(`Weather API returned ${res.status}`);
20 const data = await res.json();
21 return {
22 content: [{
23 type: 'text' as const,
24 text: JSON.stringify({
25 temperature: data.current.temp_c,
26 condition: data.current.condition.text,
27 humidity: data.current.humidity
28 }, null, 2)
29 }]
30 };
31 }
32);
33
34server.tool(
35 'convert_temperature',
36 'Convert a temperature value between Celsius and Fahrenheit.',
37 {
38 value: z.number().describe('Temperature value to convert'),
39 from: z.enum(['celsius', 'fahrenheit']).describe('Source unit'),
40 to: z.enum(['celsius', 'fahrenheit']).describe('Target unit')
41 },
42 async ({ value, from, to }) => {
43 let result: number;
44 if (from === 'celsius' && to === 'fahrenheit') result = (value * 9 / 5) + 32;
45 else if (from === 'fahrenheit' && to === 'celsius') result = (value - 32) * 5 / 9;
46 else result = value;
47 return {
48 content: [{ type: 'text' as const, text: `${value} ${from} = ${result.toFixed(1)} ${to}` }]
49 };
50 }
51);
52
53async function main() {
54 const transport = new StdioServerTransport();
55 await server.connect(transport);
56}
57
58main();
This pattern of exposing tools with structured data validation is the foundation of every production MCP server. Run your server with npx tsx src/index.ts and connect it to Claude Desktop or any MCP-compatible client to test tool calls live.
If you want to go further, Rocket's vibe coding guide covers how AI-assisted development workflows pair naturally with MCP server builds. For teams exploring full-stack AI app builders, Rocket generates production Next.js apps that can consume your MCP server's Streamable HTTP endpoint directly through the API importer.
What Are the Five Failure Modes That Break Production MCP Servers?
Quick answer: The five most common production failures are missing error handling, leaked API keys, insufficient input validation, blocking synchronous operations, and no graceful shutdown handler.
Shipping your first MCP server to production introduces failure modes you will not catch in local testing. Here are the five that break real-world deployments most often, with their consequences and fixes.
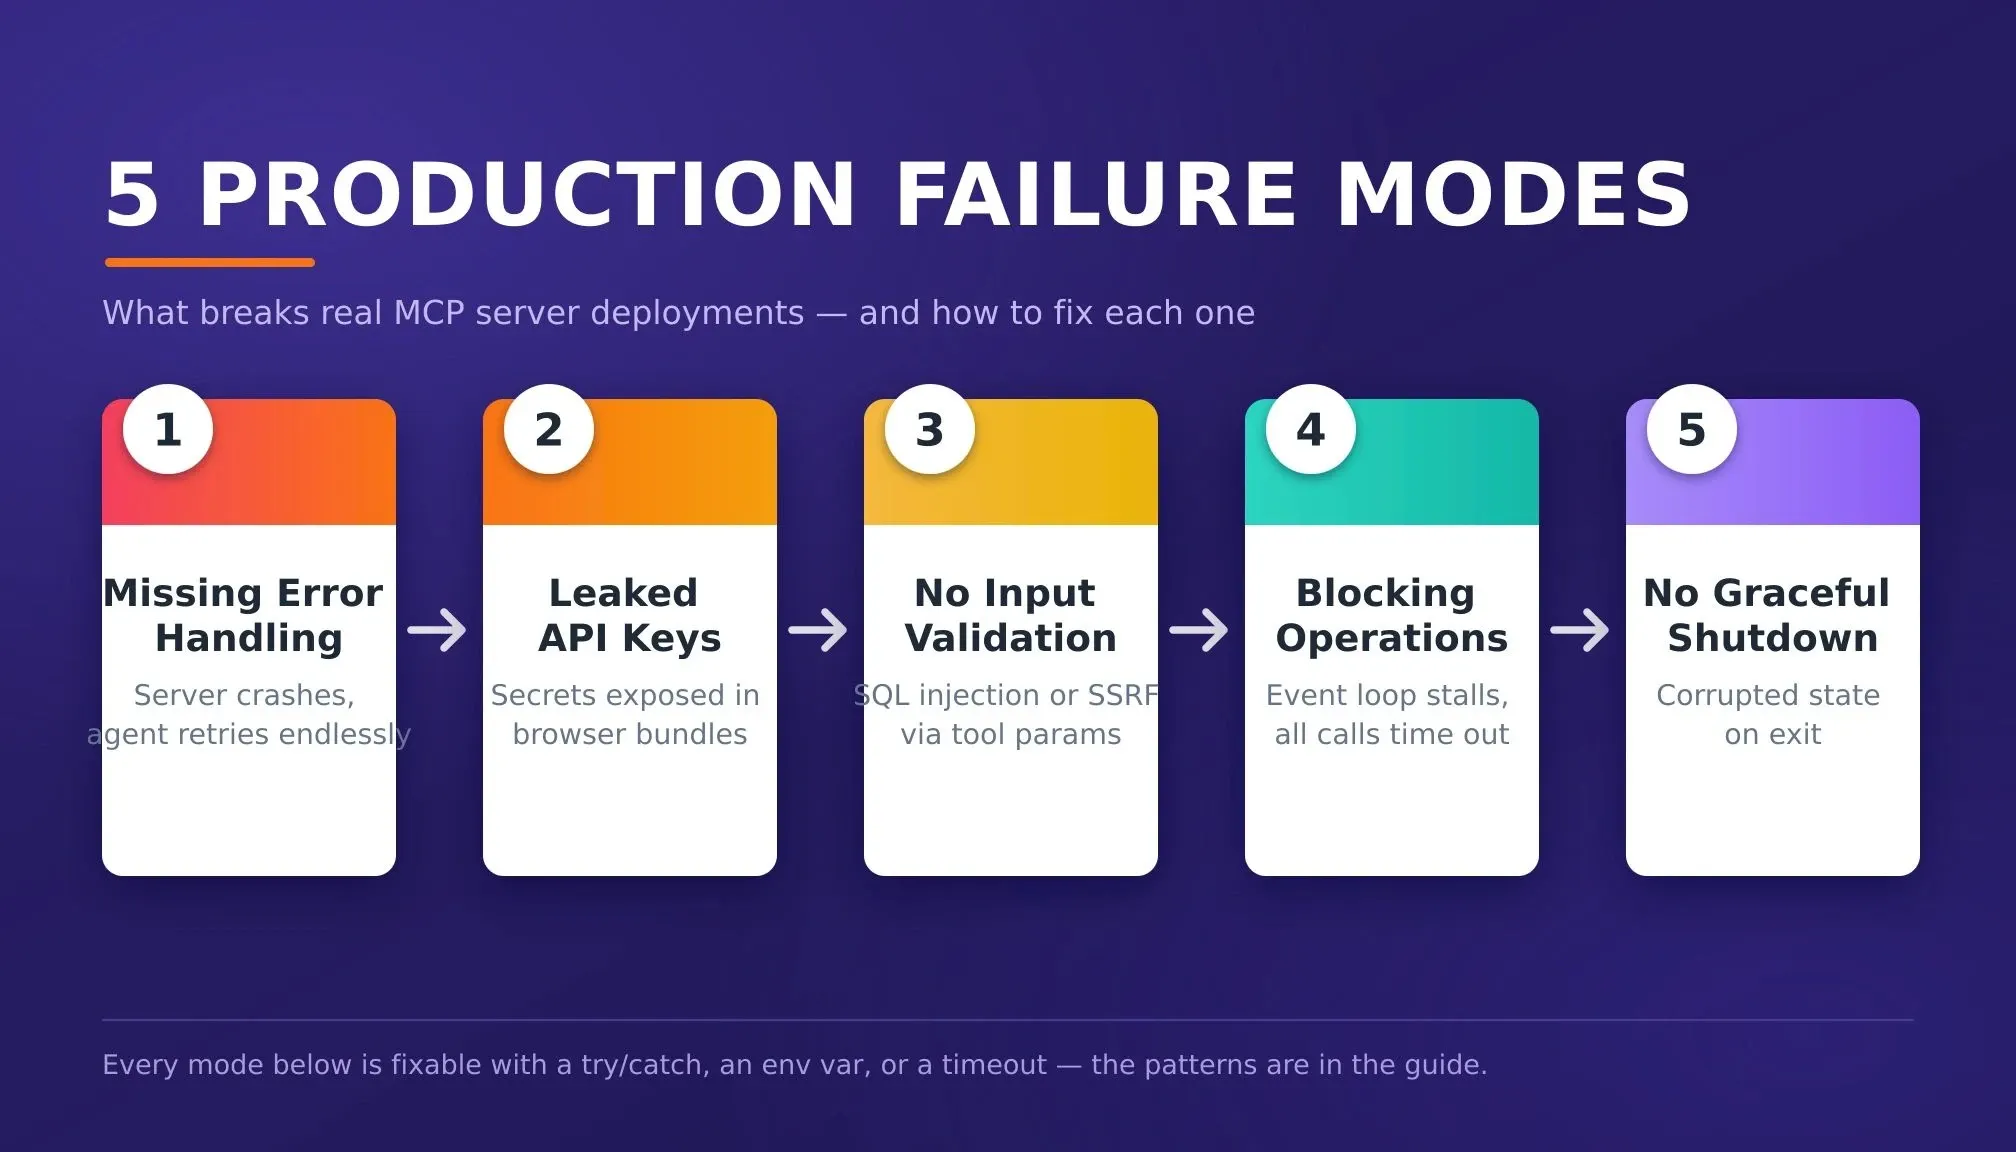
Five failure modes that break production MCP servers — and how to fix each one
1. Missing error handling on tool calls
Unhandled promise rejections crash the server process. The AI agent receives no response and retries indefinitely. Fix: wrap every tool handler in try/catch and return structured error content instead of throwing.
2. Leaked API keys in client code
Secrets exposed in browser bundles lead to compromised keys, billing abuse, and data breaches. Fix: store all API keys in environment variables at server level. Never import secrets into client-side code.
3. No input validation beyond schema
A valid schema still allows malicious input. SQL injection through tool parameters and SSRF via URL fields are both real attack vectors. Fix: validate and sanitize all inputs inside the handler — schema checks shape, not intent.
4. Blocking synchronous operations
A long-running database query or API call blocks the event loop. All other tool calls queue and time out. Fix: use async operations for all I/O, set timeouts on external calls, and consider worker threads for CPU-bound work.
5. No graceful shutdown handler
A server receiving SIGTERM during a tool call produces partial writes, corrupted state, and orphaned connections. Fix: listen for process exit signals and complete in-flight requests before closing the transport.
| Failure Mode | Consequence | Fix |
|---|---|---|
| Missing error handling | Server crashes; agent retries forever | try/catch in every handler; return isError: true |
| Leaked API keys | Secrets in client bundles; billing abuse | Server-level env vars only |
| No input validation | SQL injection, SSRF via tool params | Sanitize inside handler, not just schema |
| Blocking operations | Event loop stall; all calls time out | Async I/O; AbortController timeouts |
| No graceful shutdown | Corrupted state on SIGTERM | process.on('SIGTERM') + server.close() |
1server.tool(
2 'safe_query',
3 'Query the database safely with timeout protection.',
4 {
5 query: z.string(),
6 timeout: z.number().optional().default(5000)
7 },
8 async ({ query, timeout }) => {
9 try {
10 const controller = new AbortController();
11 const timer = setTimeout(() => controller.abort(), timeout);
12
13 const res = await fetch(process.env.DB_API_URL + '/query', {
14 method: 'POST',
15 headers: { 'Authorization': `Bearer ${process.env.DB_TOKEN}` },
16 body: JSON.stringify({ sql: query }),
17 signal: controller.signal
18 });
19
20 clearTimeout(timer);
21 if (!res.ok) throw new Error(`Database returned status ${res.status}`);
22
23 const data = await res.json();
24 return { content: [{ type: 'text' as const, text: JSON.stringify(data.results) }] };
25 } catch (err) {
26 const message = err instanceof Error ? err.message : 'Unknown error';
27 return { content: [{ type: 'text' as const, text: `Error: ${message}` }], isError: true };
28 }
29 }
30);
31
32process.on('SIGTERM', async () => {
33 console.error('Received SIGTERM, shutting down...');
34 await server.close();
35 process.exit(0);
36});
The most common mistake is treating MCP servers like stateless REST endpoints. They maintain a session. They hold context. A crash does not just drop a request — it drops the entire AI agent conversation state.
Understanding these failure modes also connects to broader web application security best practices that apply to any server-side TypeScript project. Teams building MCP servers as part of a larger product stack can also benefit from Rocket's environment variable management, which handles secret storage securely at the server level.
How Do You Ship an MCP-Connected App to Production?
Quick answer: Build your MCP server with Streamable HTTP transport, deploy it to any Node.js host, then connect your front-end application to it. Rocket handles the front-end generation, deployment, and environment variable management so you can focus on the server logic.
Building an MCP server is one part of the puzzle. Connecting it to a production application, managing environment variables for API keys, wiring up the UI, and deploying the whole thing is where most developers spend the real time.
Rocket.new is a vibe solutioning platform with three pillars that cover the full product lifecycle:
-
Solve: Validate your idea before you build. Run market research, create PRDs, and get structured reports with data, insights, and recommendations. This is the step most builders skip, and it is where Rocket's genuine differentiation over Bolt and Lovable lives.
-
Build: Generate production Next.js web apps and Flutter mobile apps from natural language. Connect your MCP server's Streamable HTTP endpoint through the API importer (supports Postman, cURL, Swagger, and OpenAPI specs), and Rocket generates the integration code, UI bindings, and error handling automatically.
-
Intelligence: Monitor competitors continuously after you launch. Automated daily briefs, pricing change alerts, and cross-signal pattern detection across nine pillars: website, social, news, hiring, traffic, product, GTM, finance, and reviews.
Where other AI builders generate isolated front-end code without persistent context, Rocket maintains shared project context across tasks. Your data model decisions, API configuration, and build history carry forward into every subsequent session.
For teams building production AI applications, Rocket's Supabase integration provides the backend layer, database, auth, and edge functions; that pairs naturally with an MCP server handling tool calls. Developers who want to understand how Rocket generates production-grade Next.js code can explore the why Rocket generates Next.js and Flutter deep-dive.
*"MCP takes some inspiration from the Language Server Protocol, which standardizes how to add support for programming languages across a whole ecosystem of development tools. In a similar way, MCP standardizes how to add additional context and tools into the ecosystem of AI applications." — *MCP Specification
What Are the Next Steps After Your First MCP Server?
The Model Context Protocol gives TypeScript developers a standardized path from "AI cannot reach my data" to "AI calls my tools natively." The patterns covered in this MCP developer guide TypeScript work today with Claude, ChatGPT, VS Code, and any MCP client that follows the specification. Your server is reusable across all of them.
Once your server is running, the natural next steps are:
-
Add resources and prompts — Tools are one of three MCP primitives. Resources expose read-only data (files, database rows, API responses). Prompts expose reusable prompt templates. Both follow the same registration pattern.
-
Add OAuth to your Streamable HTTP server: Remote servers need authentication. The SDK includes OAuth 2.0 helpers for protecting your endpoints.
-
Write integration tests: Use the InMemoryTransport from the SDK to test tool handlers without spinning up a real server process.
-
Version your server: MCP sessions are stateful. Breaking changes to tool schemas require a version bump and a migration path for connected clients.
Start building your MCP-connected app on Rocket.new. Describe what you need, import your MCP server's API spec through the connectors panel, and ship to production in minutes.
Table of contents
- -What Is the Model Context Protocol and Why Should You Care?
- -The Three Roles in Every MCP Connection
- -MCP SDK Adoption at a Glance
- -How Does the MCP Client-Server Handshake Actually Work?
- -Which MCP Transport Type Should You Choose?
- -Stdio for Local Communication
- -Streamable HTTP for Remote Servers
- -How Do You Build Your First MCP Server in TypeScript?
- -Prerequisites
- -Project Setup and Dependencies
- -Registering Tools with Zod Schemas
- -What Are the Five Failure Modes That Break Production MCP Servers?
- -How Do You Ship an MCP-Connected App to Production?
- -What Are the Next Steps After Your First MCP Server?