
ChatGPT integration connects your app's backend to the OpenAI API to send prompts and receive AI-generated responses. Create an OpenAI account, get an API key, connect it server-side, send requests, and handle responses. Never expose your key in frontend code.
ChatGPT integration means connecting your app's backend to the OpenAI API so it can send prompts and receive AI-generated text, summaries, or structured data in real time. The core steps are: create an OpenAI account, obtain your API key, connect it to your app, send model requests, and handle responses, turning AI adoption into strong tangible app value.
Why Add ChatGPT to Your App?
ChatGPT is built on advanced machine learning and natural language processing. It can generate text, summarize content, handle ChatGPT conversations, and assist users with tasks.
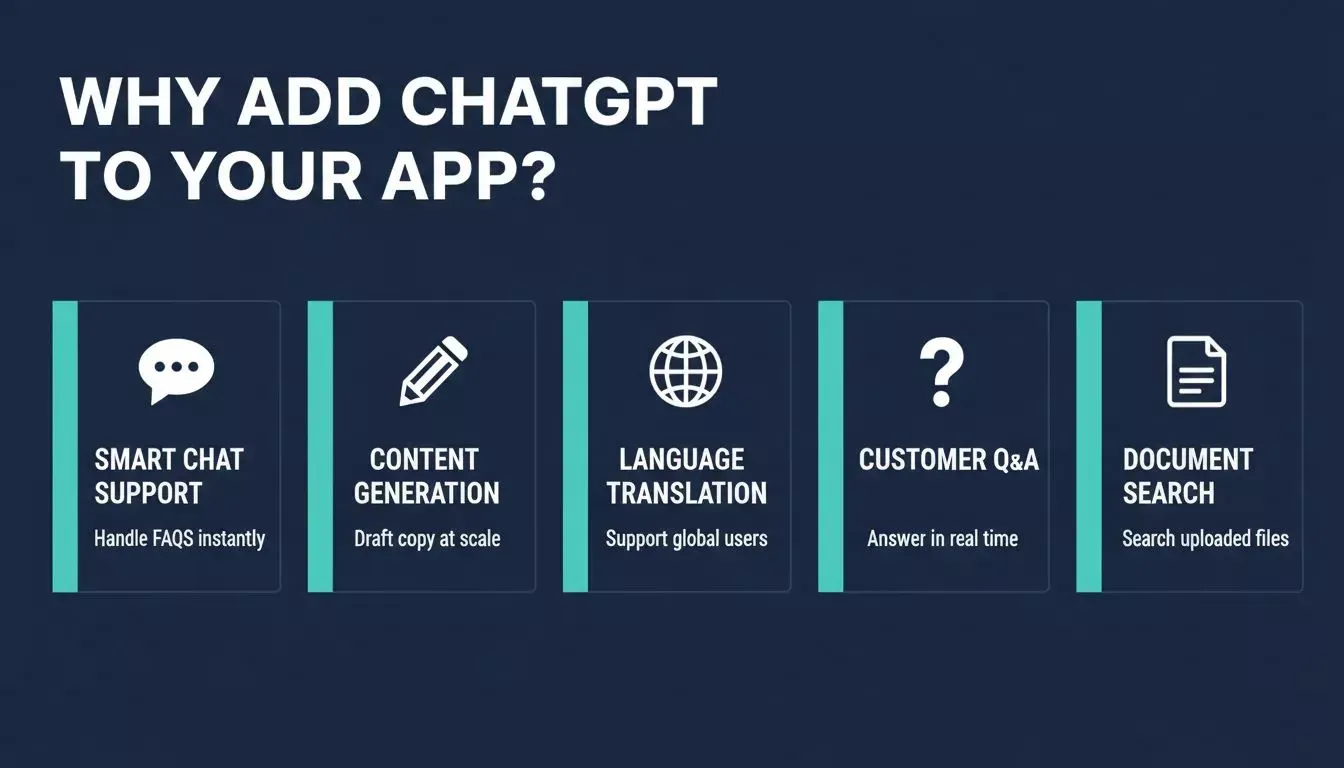
Five core capabilities ChatGPT adds to any app.
Users expect intelligent tools now. Google and Microsoft are pushing AI systems into daily technology workflows. From Google search to Microsoft Workspace tools, AI models are everywhere.
So adding ChatGPT to your app feels natural. According to a McKinsey survey, 55% of organizations had adopted AI, and that figure has continued climbing. Apps that understand and respond to natural language are increasingly the baseline expectation, not a differentiator.
How Much Does It Cost to Add ChatGPT to an App?
OpenAI charges per token, roughly per word processed in both your prompt and the model's response. Costs vary by model tier, with lighter models being significantly cheaper and fast enough for most chat use cases.
A typical small app with a few hundred daily active users might spend $5 to $50 per month at moderate usage. A high-traffic app with long conversations can reach hundreds of dollars monthly if you are not careful about context window management and max token limits. OpenAI provides a usage dashboard where you can set soft and hard spending limits. Configure these before you launch.
The key cost levers are: model selection, prompt length, response length, and how much conversation history you send with each request.
Do You Need a Backend to Use the OpenAI API?
Yes, and this is a common point of confusion. You should never call the OpenAI API directly from frontend JavaScript in a browser. Doing so would expose your API key to anyone who inspects the page source, allowing them to use your key at your expense.
The correct architecture is: your frontend sends a request to your own backend server, your backend holds the API key in an environment variable, and your backend makes the actual call to OpenAI. The backend then returns the response to the frontend.
If you do not want to build and manage a backend yourself, platforms like Rocket.new handle this automatically. Your API key is stored in a secure connector, and the generated Next.js app handles all server-side API calls for you.
Step 1: Create an OpenAI Account and Get API Access
Start by creating an OpenAI account on the official website. After you sign up, you will get API access through your dashboard. Inside your account, generate an API key. This API key acts like a password. Treat it as a secret key and never expose it in public code.
Store it in environment variables or a secure file. You may create multiple keys for different environments. At minimum, keep development and production keys separate so a leaked development key does not affect your live app.
Keep your keys organized. Rotate keys when needed. If a key gets blocked or leaked, delete it from your account and create a new one immediately.
Step 2: Choose the Right API Model
OpenAI provides different models for different use cases. Some are optimized for chat. Others are better at reasoning or complex tasks. You select the API model when sending API requests.
Here is a comparison of AI providers available for app integration:
| Provider | Best For | Chat | Content | Image Understanding | Web Search | Voice |
|---|---|---|---|---|---|---|
| OpenAI | General-purpose AI | Excellent | Excellent | Yes | No | No |
| Anthropic | Nuanced analysis, long-form | Excellent | Excellent | Yes | No | No |
| Gemini | Multimodal (text + images + video) | Excellent | Good | Excellent | Limited | No |
| Perplexity | Factual search with citations | Good | Limited | No | Excellent | No |
| ElevenLabs | Voice generation, text-to-speech | No | No | No | No | Excellent |
For most apps starting with ChatGPT integration, OpenAI is the right default. GPT models handle chat, content generation, code writing, summarization, and classification well, and have the largest ecosystem of community examples to draw from.
The responses API is commonly used to send input and receive structured responses. It supports ChatGPT conversations and can manage message history for better context. Selecting the right model improves performance and helps control costs.
Step 3: Connect ChatGPT to Your App
Now it is time to connect ChatGPT to your backend system. Here is the full request-response flow from user input to app output:
Flow: User Input → Your Backend → OpenAI API → Model Response → Your Backend → App Display
The same flow in plain steps:
- User enters input in the app
- Frontend sends request to your backend
- Backend reads API key from environment variable
- Backend sends API request to OpenAI
- OpenAI returns the response to your backend, which sends it to the frontend
Basic code structure (Next.js TypeScript, server-side route):
1// pages/api/chat.ts
2import type { NextApiRequest, NextApiResponse } from 'next';
3import OpenAI from 'openai';
4
5const openai = new OpenAI({
6 apiKey: process.env.OPENAI_API_KEY,
7});
8
9export default async function handler(req: NextApiRequest, res: NextApiResponse) {
10 const { message, history } = req.body;
11
12 const completion = await openai.chat.completions.create({
13 model: 'gpt-4o',
14 messages: [
15 { role: 'system', content: 'You are a helpful assistant.' },
16 ...history,
17 { role: 'user', content: message },
18 ],
19 max_tokens: 500,
20 });
21
22 res.json({ reply: completion.choices[0].message.content });
23}Never hardcode secret keys inside frontend files. That is how keys get leaked. After setting up your route, test your requests in development before deployment.
Step 4: Handle Message History and Context
If you want real ChatGPT conversations, you must manage message history. The model does not automatically remember previous exchanges. You control context by sending relevant prior messages with each new request.
The trade-off is real: sending more history gives the model better context and produces more coherent responses, but it also increases token usage and cost. A practical approach is to keep the last 10 to 20 exchanges in memory and summarize or truncate older history.
One pattern worth knowing: if a user asks a follow-up question that only makes sense in context, the model will produce a confused response if you do not include the prior exchange. Always send at least the immediately preceding turn.
Step 5: Add File Search and Multimodal Capabilities
Many apps now go further than text chat. With file search, you can upload a file and let ChatGPT search it. This is especially valuable for apps that need to answer questions from user-uploaded documents.
This is helpful for legal documents, research papers, product manuals, and training guides. Some models also support multimodal capabilities, processing text, images, or video input in a single request.
One caveat: file processing and multimodal requests consume significantly more tokens than plain text chat. Factor this into your cost estimates before building these features into a free tier.
Step 6: Manage Usage Limits and Costs
OpenAI API works on usage-based pricing. The main cost drivers are: number of API requests, total tokens per request (prompt and response), and model selection.
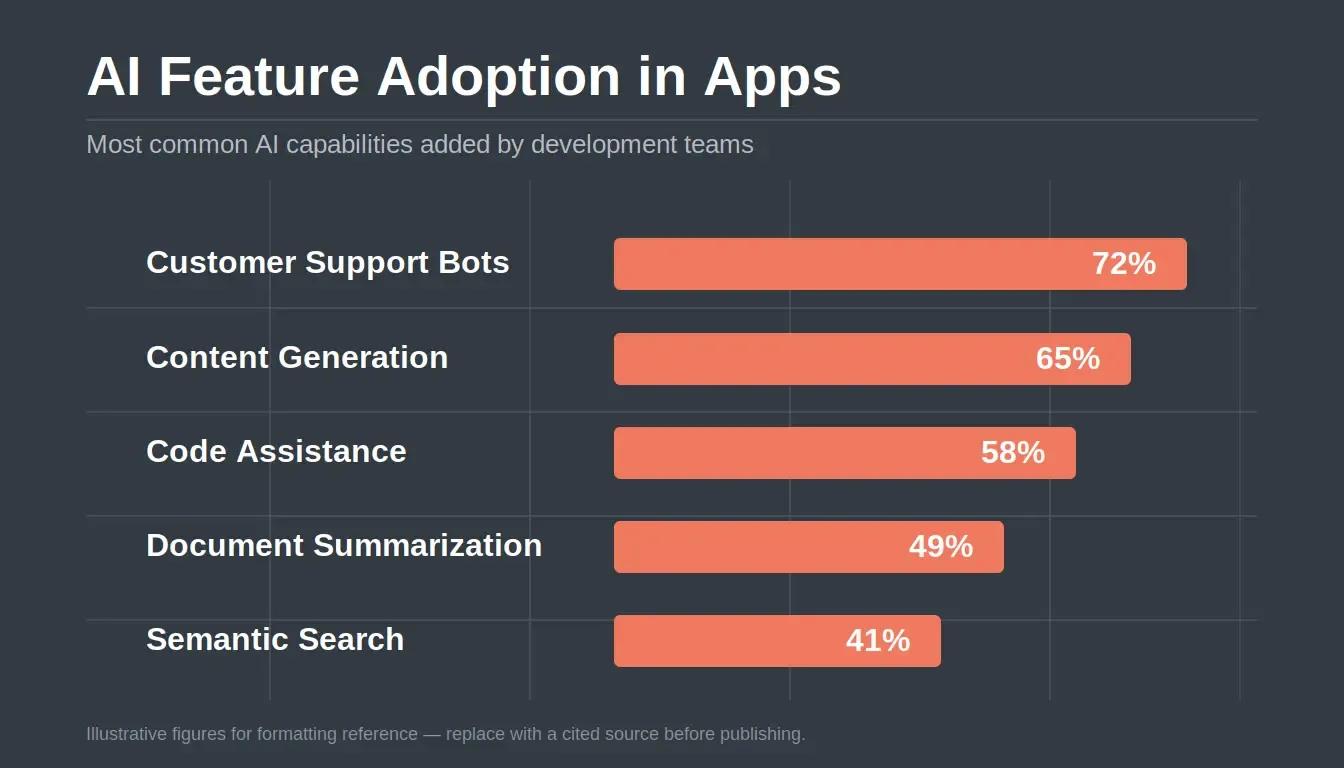
AI feature adoption rates across development teams.
Each OpenAI account has usage limits. New accounts start at lower rate limits. If you hit these in production, you can request a tier upgrade from the OpenAI dashboard. Set soft and hard spending limits in your account settings before launch to prevent a runaway loop or a scraper from generating an unexpectedly large bill.
On Reddit, a developer in r/AiAutomations put it plainly:
"Free unlimited OpenAI APIs? What's the catch? You still hit unforeseen limits, token usage matters, and billing surprises can happen if you don't set guardrails."
This is the most common operational mistake teams make when shipping their first AI-powered app.
Security and Data Handling
Security matters. When integrating AI into your app, you must protect credentials and handle user data responsibly from the start.
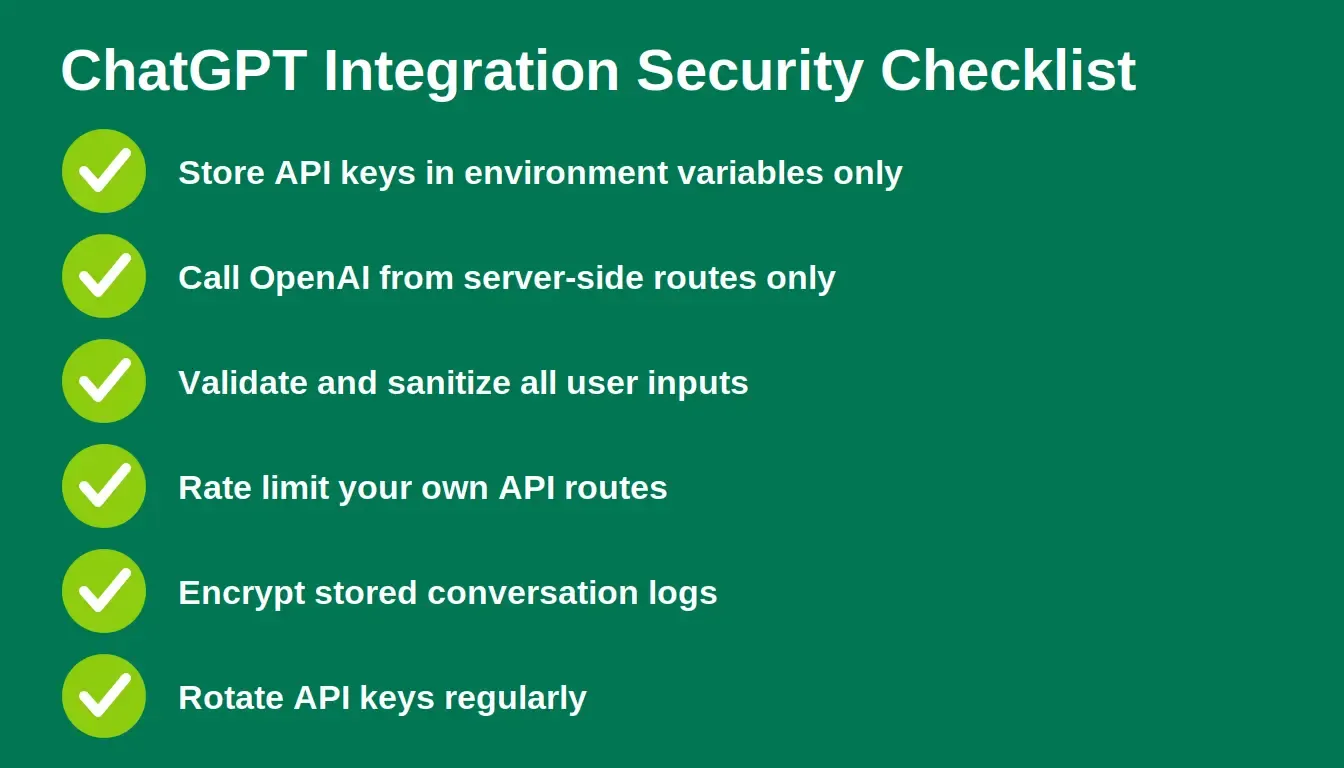
Six non-negotiable security practices for any ChatGPT-powered app.
Even if OpenAI secures its services, your system is responsible for how data is handled. Keep your architecture secure, minimize data sharing, and treat user information with care.
Security checklist for ChatGPT integration:
- Store API keys in environment variables, never in source code
- Call the OpenAI API from server-side routes only, never from the browser
- Validate and sanitize all user input before sending it to the model
- Implement rate limiting on your own API routes to prevent abuse
- Do not log full conversation content unless required, and if you do, encrypt it
- Rotate API keys periodically and immediately if you suspect exposure
For a broader security framework, the web application security checklist covers authentication, data handling, and deployment hardening for production apps.
Fine-Tuning and Custom Behavior
Sometimes, generic ChatGPT responses are not enough. You can adjust behavior through several mechanisms, each with different trade-offs.
System prompts are the fastest and cheapest way to shape behavior. A well-written system prompt can constrain the model to a specific persona, domain, or response format without any additional training cost. Start here.
Structured instructions, including few-shot examples in your prompt, help the model understand the exact output format you need. Fine-tuning trains a custom model on your own data and works well for specialized domains, but it adds meaningful cost and maintenance overhead. Exhaust prompt engineering options first.
Real Use Cases
Here are some practical use cases, each using the same OpenAI API foundation with different configuration and logic:
- Customer support chat inside an ecommerce app, reducing first-response time and handling FAQs at scale
- Content generation tool for marketers, drafting blog posts, ad copy, and product descriptions from brief inputs
- AI assistant inside a Google Workspace-style productivity tool, summarizing documents and drafting replies
- Internal knowledge base for enterprise teams, answering questions from uploaded documentation
- Education app that answers student questions, providing explanations tailored to the student's level
For a broader look at how to integrate AI capabilities beyond ChatGPT, see this guide on how to integrate AI into an app. If you are evaluating the leading platforms and their trade-offs, the best AI app builder guide is a useful reference.
Testing and Deployment
Before deploying, test everything systematically, not just the happy path.
Test these scenarios specifically:
| Scenario | What to Check |
|---|---|
| Valid request | Response returns correctly, latency is acceptable |
| Empty or very short input | Model handles gracefully, no crash |
| Very long input (near token limit) | Truncation or error handled cleanly |
| Rate limit hit | App shows a user-friendly message, does not expose the error |
| Invalid API key | Error caught server-side, not exposed to frontend |
| Network timeout | Retry logic or fallback message shown to user |
| Offensive or out-of-scope input | System prompt constraints hold |
Simulate real users. Send many requests. Check system logs. After the successful test phase, deploy to the production server and keep monitoring performance. Token usage and latency can shift significantly as your user base grows.
Build Your AI App Faster with Rocket.new
Rocket.new is the vibe solutioning platform built for founders and builders who want to ship production-ready apps without building backend infrastructure from scratch. It combines three capabilities in one platform: Solve for market research and PRDs, Build for AI-generated web and mobile apps, and Intelligence for continuous competitor monitoring.
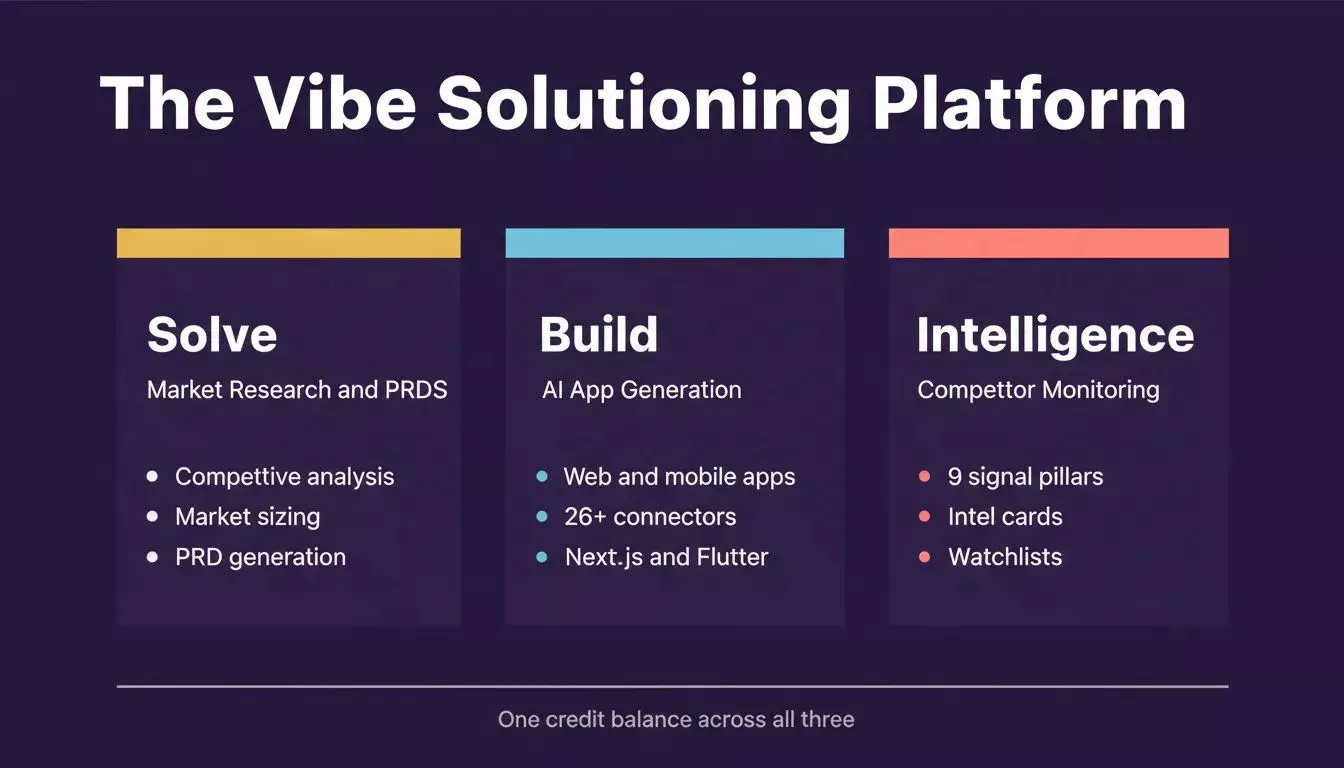
Rocket.new combines Solve, Build, and Intelligence in one platform, with 26+ connectors including OpenAI.
For ChatGPT integration specifically, Rocket.new's OpenAI connector handles secure key storage and server-side API routing automatically. You can focus on what your AI features should do, not on wiring up the plumbing.
Important technical notes before you connect:
- The OpenAI connector is available for Next.js TypeScript web build tasks only
- It is a task-level connector — each Build task connects to its own API key independently
- Never paste your API key directly into the chat panel. Always use the secure connector popup
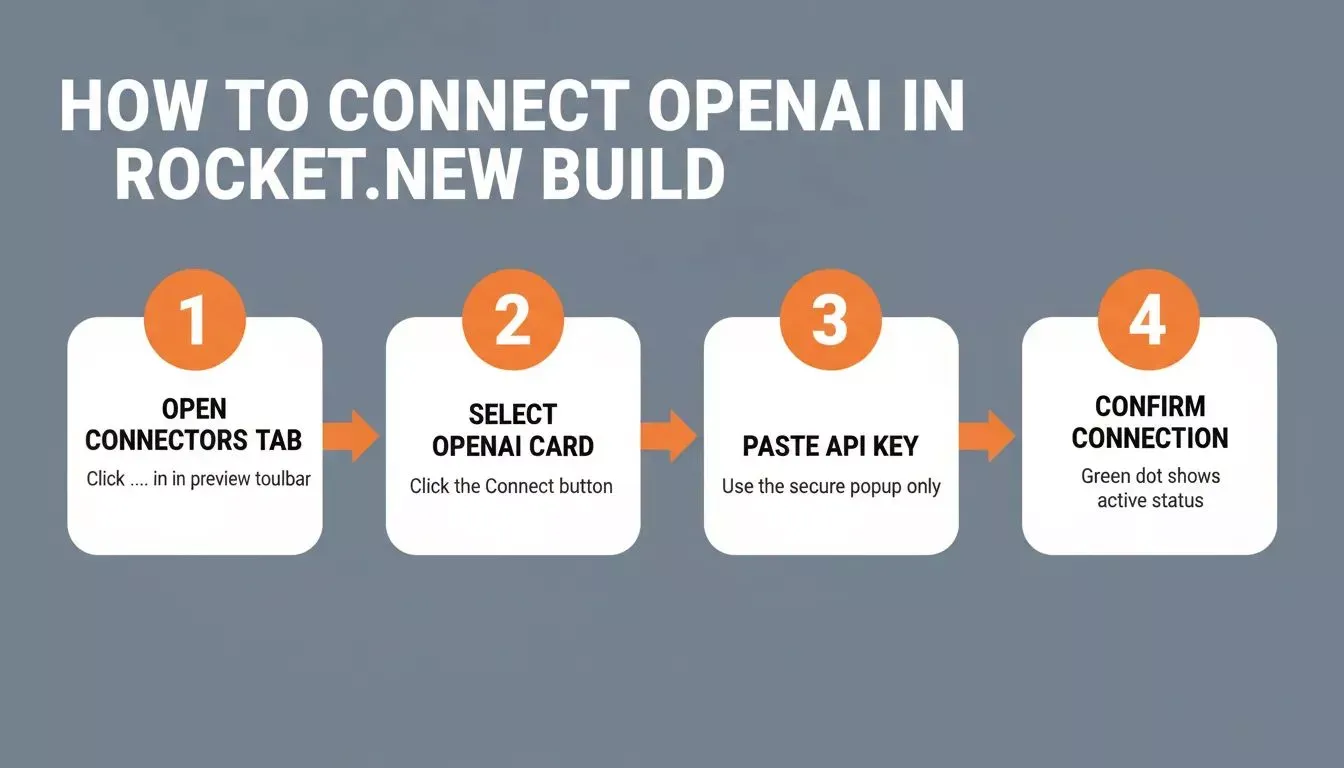
Four steps to connect OpenAI in Rocket.new Build.
Option 1: From chat
Type a prompt that mentions OpenAI or GPT, for example: Connect OpenAI and add a GPT-powered chat assistant to my app. Rocket.new detects the intent and shows a Connect button inline. Click it and the secure popup opens.
Option 2: From the Connectors tab
Click the ... button in the preview toolbar, then select Connectors. Find the OpenAI card and click Connect.
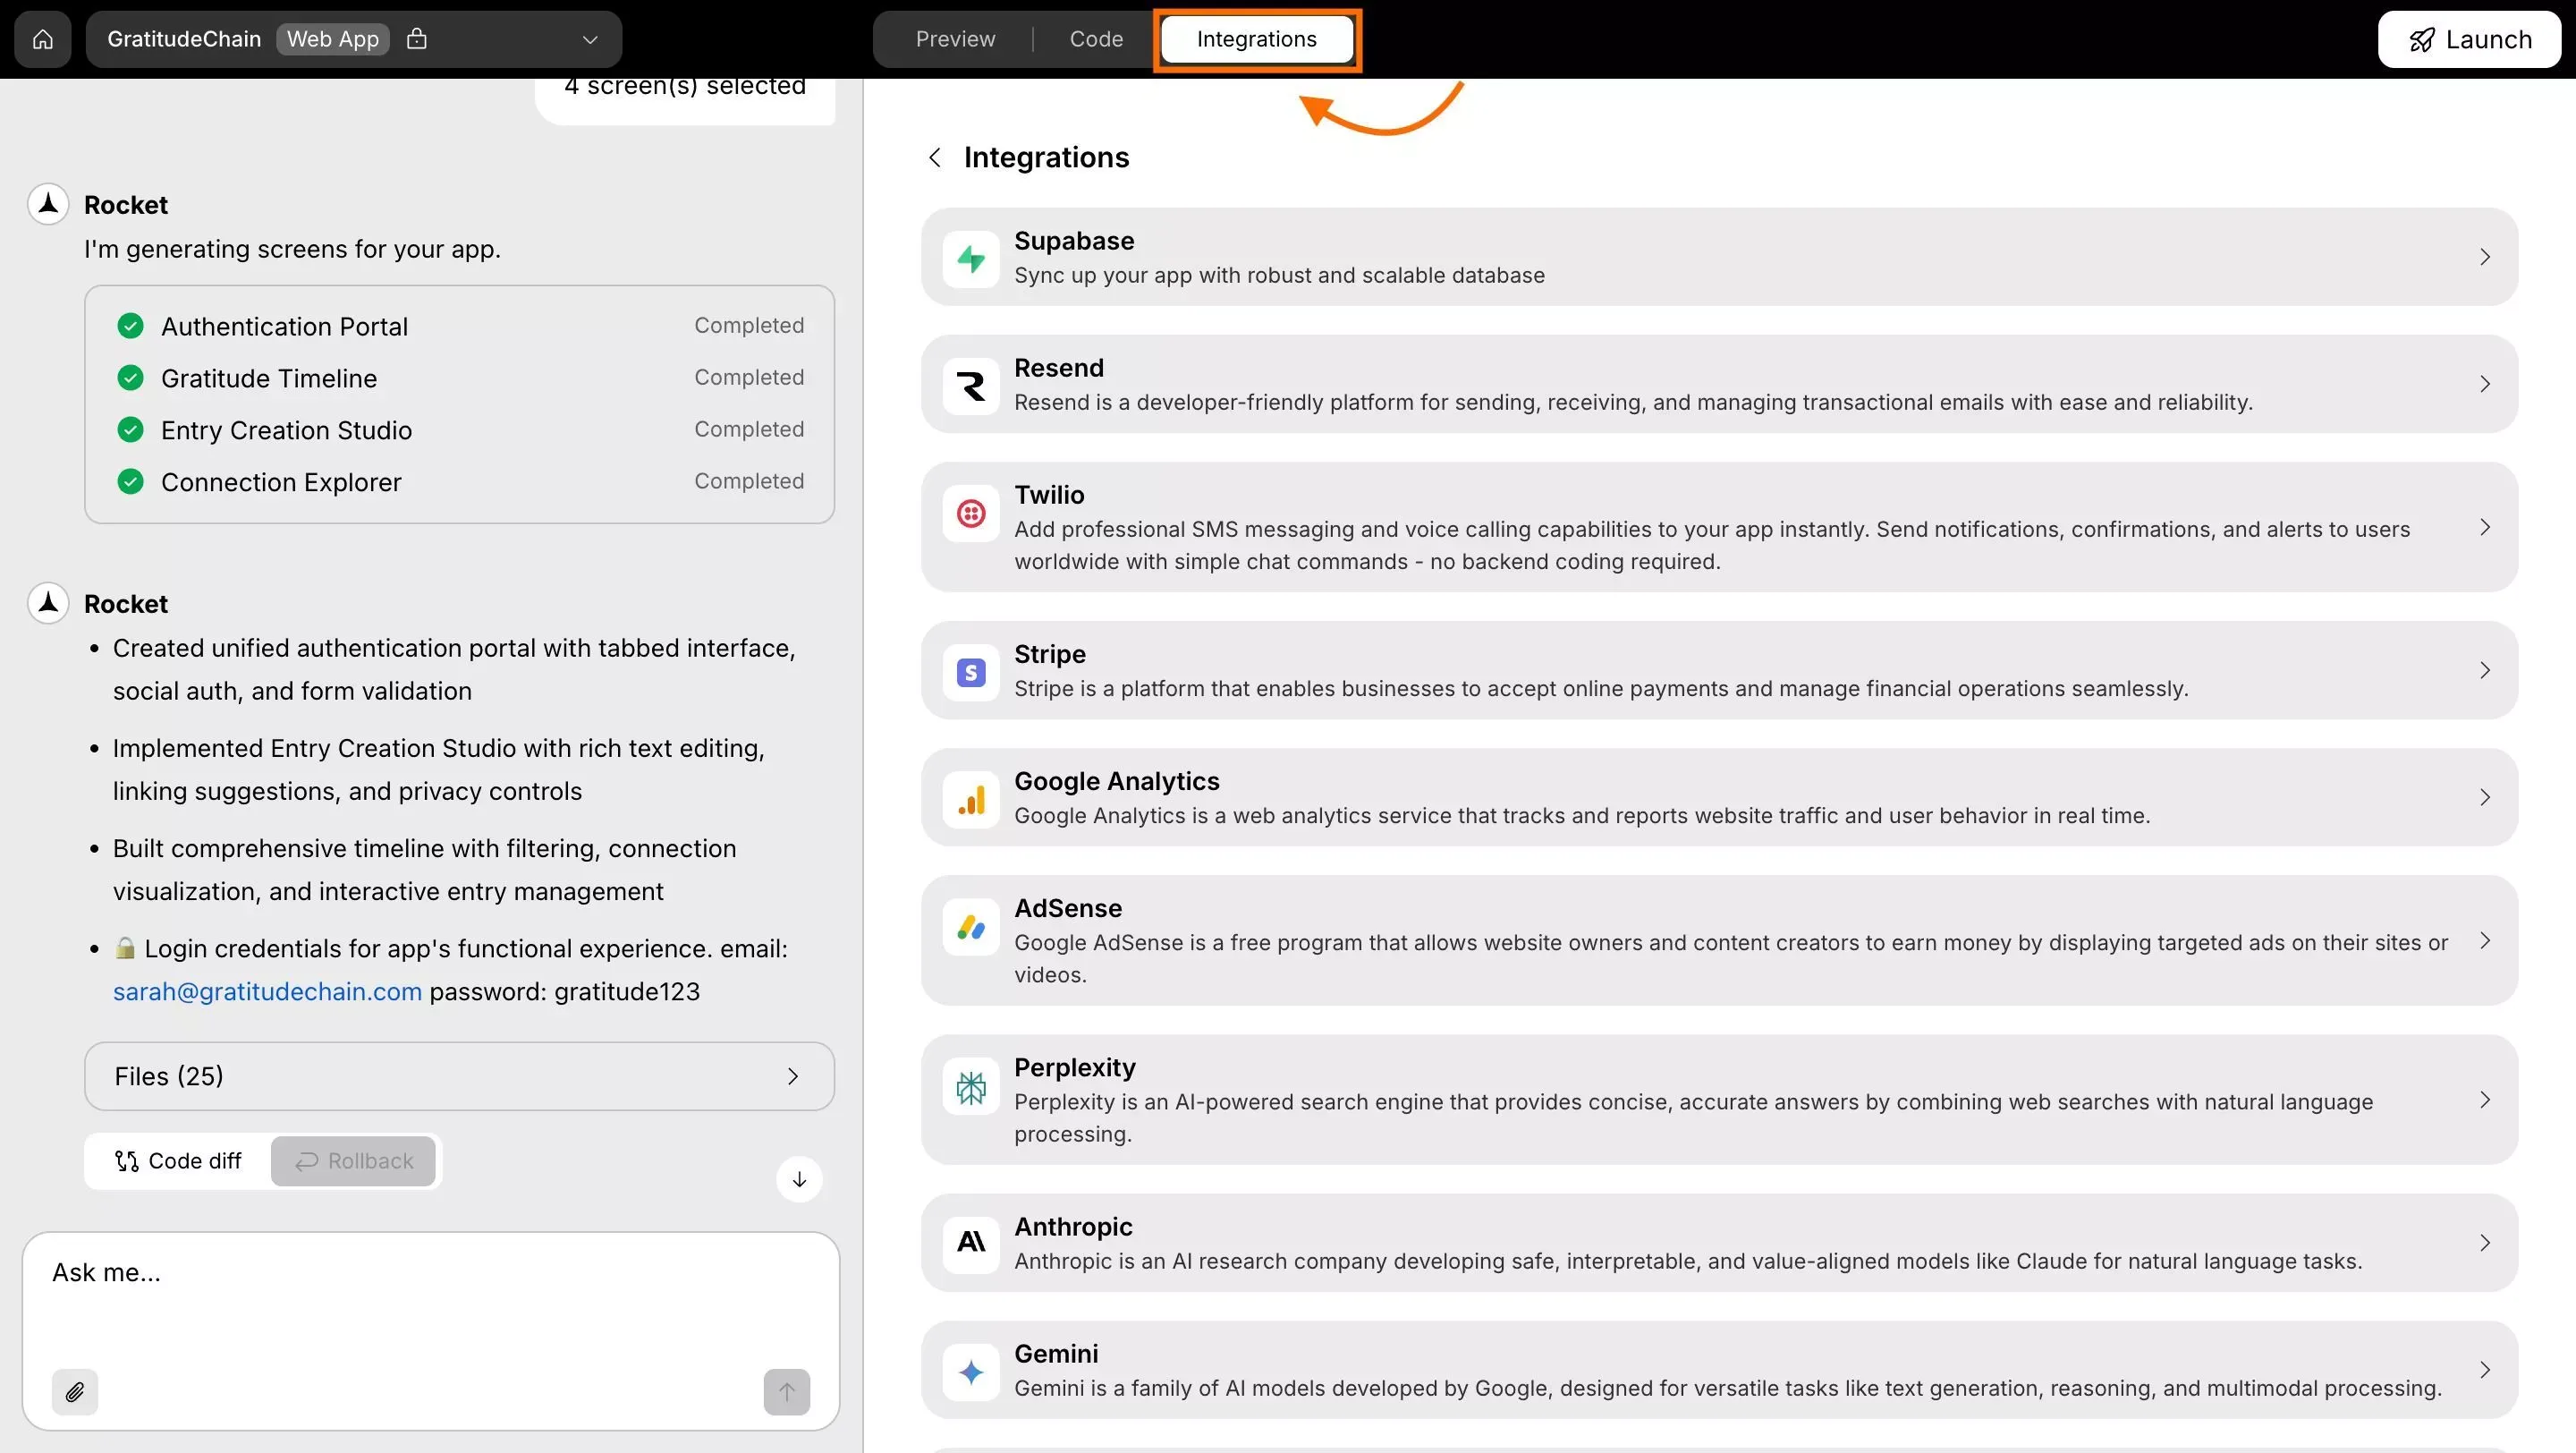
The Connectors panel in a Rocket.new Build task, where you connect OpenAI and 26+ other services.
After clicking Connect, paste your API key and click Connect. A green dot appears next to OpenAI when the connection is active. To update the key later, go to Connectors > OpenAI and click Edit. To remove it, click Disconnect.
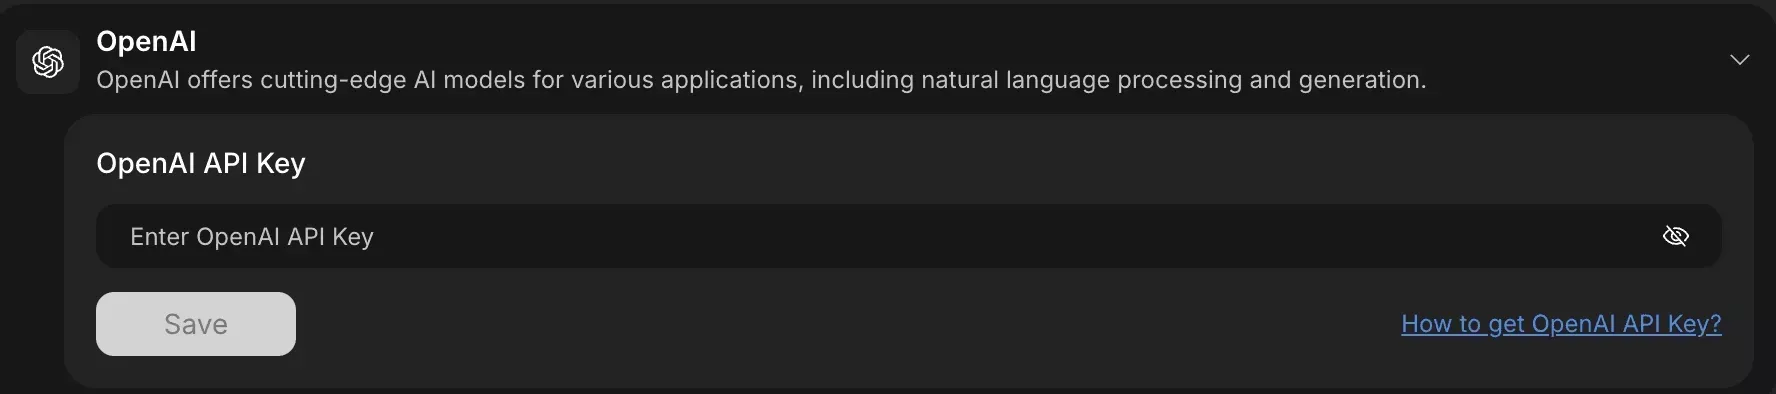
The secure OpenAI connector popup in Rocket.new. Paste your API key here, never in the chat panel.
Beyond OpenAI, Rocket.new's connector library includes 26+ services: Stripe, Supabase, HubSpot, GitHub with two-way sync, Anthropic, Gemini, Perplexity, and ElevenLabs. You can connect multiple AI providers to the same project and use each for the task it handles best.
Example prompts to try after connecting:
- Add an AI chatbot to my app that answers user questions using OpenAI GPT.
- Build a blog post generator where users enter a topic and get a full draft from GPT.
- Summarize meeting notes into key decisions and action items using GPT.
- Analyze customer feedback sentiment using OpenAI and display results in a dashboard.
For teams building SaaS products specifically, the how to build a B2B SaaS product with AI guide covers architecture decisions and connector choices in detail. If you are weighing the cost of building with an AI platform versus hiring a developer, the AI app builder vs. hiring developer ROI breakdown is a practical comparison.
Integrate ChatGPT Into an App With Right Model
Building complex AI systems from scratch is not realistic for most teams.
Use the OpenAI API. Create an OpenAI account. Generate API keys. Select models. Send requests through the responses API. Manage message history and file search. Monitor usage limits. Protect your secret key. Test carefully. Deploy confidently.
Learning how to integrate ChatGPT into an app is mostly about structure, not magic. Set up your API key correctly. Manage context. Watch costs. Pick the right models and tools for your use cases. Keep it simple. Build step by step. Let ChatGPT handle the language work while your app handles the experience.
Ready to build your AI-powered app without wiring up backend infrastructure from scratch?
Rocket.new lets you connect the OpenAI API securely, generate your full Next.js app from a prompt, and ship to production in hours. Start building for free and see how fast you can go from idea to live product.
Table of contents
- -Why Add ChatGPT to Your App?
- -How Much Does It Cost to Add ChatGPT to an App?
- -Do You Need a Backend to Use the OpenAI API?
- -Step 1: Create an OpenAI Account and Get API Access
- -Step 2: Choose the Right API Model
- -Step 3: Connect ChatGPT to Your App
- -
- -Step 5: Add File Search and Multimodal Capabilities
- -Step 6: Manage Usage Limits and Costs
- -Security and Data Handling
- -Fine-Tuning and Custom Behavior
- -Real Use Cases
- -Testing and Deployment
- -Build Your AI App Faster with Rocket.new
- -Integrate ChatGPT Into an App With Right Model